
Do you like crafts and want to learn how to make a diamond painting? In this article, you will learn everything you need to get started in your new passion, otherwise known as diamond embroidery.
You don't know how diamond painting works
There is a lot of information available on the internet and you don't know where to start. You can't decide which canvas to choose. What format to take? What types of diamonds to take? What are the differences between the types of pearls? How to glue diamonds?
We all ask ourselves these questions when we discover diamond painting, and rest assured it's completely normal. We've been there too and at the beginning, we struggled like you....
But luckily for you, we are going to pass on our know-how and experience to you so that you can get started properly and no longer ask yourself all these questions!

Complete Diamond Painting Kits
At first, no need for accessories!
When you want to make your first diamond painting canvas, know that you do not need to buy accessories. For the simple reason that atDiamond Faction , we deliver our diamond painting kits with everything you need to make the canvas.
This means that no matter which canvas you choose, you will automatically have all the accessories that will allow you to make your diamond painting. We will come back to the accessories that you will have to use a little later.
Choosing a complete diamond painting kit
Now you can rest assured that you will have a complete kit on your favorite Diamond Faction site.
The first step is to choose a canvas that suits you, that you like and that you have a crush on. To do this, you will have to choose from all the categories. There is something for everyone.
Here is a short, non-exhaustive list of the most popular categories of diamond painting kits:
- Diamond Painting Animals
- Diamond Painting Flowers
- Diamond Painting Cities
- Diamond Painting Landscapes
And there are many more! As you can see, you have to choose your canvas according to your personal tastes. It is even possible to personalize your canvas with your own photo, see the Personalized Kit .
What format to choose in diamond painting?
When you go to browse the different canvases on your favorite store (always Diamond Faction , obviously), you will have to choose between different sizes of canvases.
To put it simply, the larger the dimensions of your canvas, the sharper (and therefore less pixelated) your canvas will be. Some people prefer smaller canvases to start with, which is the smartest choice to avoid spending a lot when it's your first time.
If you want a sharper rendering straight away, we strongly recommend that you switch to larger formats (like 60x60cm which gives a very good rendering).
Round or Square Diamonds?
Congratulations! You have chosen the canvas you like and you have chosen the format that best matches the result you want to give. However, there is still one choice to make (Don't worry, it's the last one).
In Diamond Painting, there are two main categories of diamonds: Round or square shaped beads . There is another type of diamond (AB diamond: Aurora Borealis) but first, we will see the most common ones.
Round Diamonds
The round diamond is the perfect choice for a beginner. Even experienced players use them. We will explain why.
This type of diamond is very simple to place and easy to handle. They are also suitable for people with motor difficulties with their hands.
They leave a little space between them but despite this, the result is stunning. These are the diamonds that our customers prefer.
Square Diamonds
One might ask, if round diamonds are so perfect, why choose square diamonds? It's all a matter of preference really.
Square diamonds require more precision when setting, requiring perfect alignment for a smooth finish on the canvas. When set correctly, the result is even more incredible. It can leave you speechless, so perfect will the canvas be.
On the other hand, this requires a certain rigor, and it is not recommended for making your very first canvas. To help you, you can use this laying rule which is a way to get around the bad alignment of the square beads.

How to stick your diamonds in Diamond Painting
You have just received your first complete diamond embroidery kit, welcome to the world of diamond painting! Now it's time to get down to business, how to do it?
Accessories provided in the Kit
In your complete kit (you saw it coming, on your favorite Diamond Faction site for a change), you have:
- 1 High Quality Numbered Adhesive Canvas
- Individual Bags of Numbered Diamonds
- 1 Diamond Painting Pen
- Diamond Painting Special Glue
- 1 Diamond Painting Sorting Tray
- Sometimes we give away a pair of pliers
You see, you already have quite a bit of material in a single kit!

Understanding the DMC color code
On the outline of your canvas, you have a color code called DMC (To learn more, you can read this article on the origin of DMC ). This is presented in the form of a 3-column table:
- The number of the diamond bag
- The diamond symbol
- The DMC color code
- The quantity of diamonds (depending on the canvas)
On your canvas, you have different symbols that represent the type of diamond to use. You will see, even a 2-year-old child can understand it. You simply have to look at the symbol of your choice, then look at the correspondence on the table. Finally, open your corresponding bag.

Start your Diamond Painting kit
Once you have understood the DMC color code (with ease), you will have to remove the protective film stuck to the canvas.
Our advice is to remove the film completely and stick baking paper in its place over the entire canvas. And this for 2 reasons:
- You will be able to spot places without diamonds much better.
- You will be able to come and work on any area without leaving the glue of the canvas exposed to the air.
Once the baking paper is stuck to the canvas, we use a precision scalpel specially designed for diamond embroidery, but any other cutting tool will do. We make areas in squares and this allows us to work on the area of our choice.
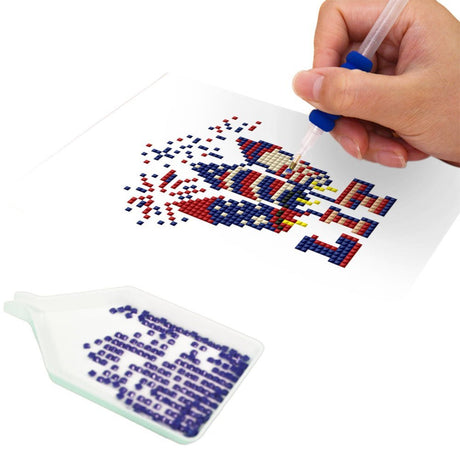
Using the Diamond Painting Pen
Once you've chosen an area and cut it out, it's time to grab your sorting tray, glue, and pen (or stylus for the purists).
Here are the different steps explained simply:
- Place the diamonds of your choice in the sorting tray to easily pick them up
- Remove some of the protective film from the glue and immerse the tip of the pen completely in the glue
- Pick up a diamond from the sorting tray (from the top) and stick it to the end of the pen
- Apply the diamond to the correct symbol (the canvas glue will do the rest of the work)
And there you have it, you have glued your first diamond in just four steps! You are already becoming a future diamond painting expert. All you have to do now is apply the process to your entire canvas.
Framing your Diamond Painting
Your painting is now finished, and you don't know what to do with it? You can give it to a friend or sell it. At Diamond Faction , we have a preference for framing.
We like to frame our paintings in our room. Many of our customers also opt for this solution. It allows you to have an original piece. Of course, you have to make sure that it fits with your room and your decoration.
You can discover our range of frames here . 
Join a passionate community
You have no more excuses. With all this information, you are able to create diamond embroidery canvases with incredible results!
Subscribe to our newsletter to join our community and follow the latest trends in Diamond Painting. You also get -10% off your first order, a bargain for your first time (in diamond painting of course).


3 comments
Site complet, parfait pour les débutants !
encore merci pour les infos, tres pertinent.
Merci beaucoup pour ce partage, moi qui débute le diamond painting cela m’aide pour commencer !!